
How to Use Support and Resistance in Binary Options Trading
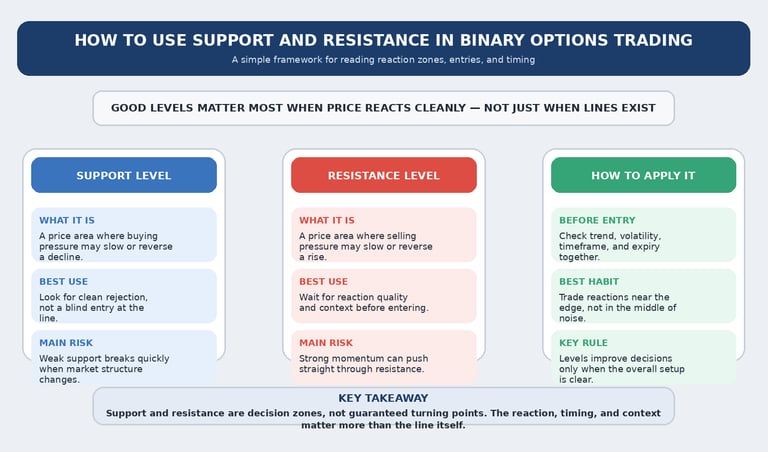
Support and resistance are among the most useful concepts in binary options trading, but they are also among the most misunderstood. Many traders draw a few horizontal lines on a chart and assume those lines alone will create profitable entries. In reality, support and resistance are not automatic signals. They are decision zones. What matters is how price behaves when it reaches them.
That distinction is especially important in binary options because every trade has a fixed expiry. A level may be valid, but if the reaction is weak, late, or too slow, the contract can still lose. This is why support and resistance should never be treated as isolated lines on a chart. They need to be read together with market conditions, volatility, timeframe, and expiry selection.
If you are still comparing brokers, start with our Top Brokers, then review platform quality in Broker Reviews and compare key differences in Broker Comparisons. This topic also connects naturally with How to Read Market Conditions Before Entering a Binary Options Trade, How to Choose the Right Expiry Time in Binary Options, How Volatility Affects Binary Options Trade Timing, and Best Timeframes for Binary Options Trading Strategies.
What support and resistance really mean
Support is an area where falling price may slow down, pause, or reverse because buying interest becomes strong enough to matter. Resistance is the opposite. It is an area where rising price may hesitate or turn because selling pressure starts to appear. In practice, these levels represent zones where traders have reacted before and may react again.
The important word here is area. Support and resistance are rarely exact single-price lines. They are often small zones where price begins to behave differently. Traders who treat them too mechanically often enter too early, too late, or for the wrong reason. A level matters most when price reaches it and shows a meaningful reaction.
That is why these concepts are valuable in binary options. They give structure to entry decisions. Instead of trading randomly in the middle of the chart, the trader begins to focus on places where price is more likely to respond. That does not guarantee the trade will win, but it improves the logic behind why the trade is being considered.
Why levels matter more in binary options than many beginners realize
In binary options, you do not need a huge move. You need the market to finish in the right place when the contract expires. That makes support and resistance especially useful because they often define where price may hesitate, reject, or continue. A clean bounce from support can be enough for a winning call option. A clear rejection from resistance can support a put trade.
At the same time, this is why poor use of levels is so dangerous. A beginner may see price touching support and enter immediately, even though the broader market is trending down strongly and the level is likely to break. Another trader may see resistance, enter a put, and ignore that volatility is expanding upward with strong momentum. In both cases, the level exists, but the context around it makes the trade much weaker.
This is why support and resistance work best when combined with market reading. If you have not already done so, How to Read Market Conditions Before Entering a Binary Options Trade should be seen as a companion piece to this article.
How traders should actually use support and resistance
The best use of support and resistance is not to predict every turning point. It is to improve trade location. A trader should ask whether price is approaching a meaningful area, whether the reaction looks clean, and whether the wider market structure supports a bounce, rejection, or breakout.
In a range market, support and resistance often become the edges of the structure. This is where the clearest opportunities usually appear. A trader may wait for price to approach the lower boundary of the range and look for a stable reaction before considering a call. The same logic can apply at the upper boundary for puts. In these conditions, levels are often more reliable because price is already moving between visible zones.
In a trending market, support and resistance behave differently. Resistance in an uptrend may be broken more easily, while support on pullbacks may offer better continuation entries. In a downtrend, resistance zones can become stronger places to look for rejection. The key is to align the level with the prevailing market direction rather than treating all levels as equally strong.
Why reaction matters more than the line itself
One of the biggest mistakes beginners make is assuming that drawing a level is enough. It is not. The level only becomes useful when price reacts in a way that supports the trade idea. That could mean a clean rejection candle, a slowing of momentum, repeated failure to break through, or a structured pullback that respects the zone.
This is where patience matters. Instead of entering the moment price touches a level, stronger traders usually wait for evidence that the market is actually responding. That small difference often improves trade quality significantly. It keeps the trader from entering blindly into a level that may fail.
It also improves expiry selection. If the reaction is immediate and clear, a shorter expiry may make sense. If the reaction is slower or the market is less active, more time may be needed. That is why How to Choose the Right Expiry Time in Binary Options should be read together with this topic. A good level with the wrong contract timing can still become a losing trade.
Support and resistance only work well with the right context
Levels should never be judged alone. Volatility, timeframe, and market condition all shape how useful they are. In calm markets, reactions may develop more slowly and require longer expiry. In highly volatile conditions, levels may be tested more aggressively and break more often. That is exactly why How Volatility Affects Binary Options Trade Timing matters here.
Timeframe also changes what a level means. A support zone on a higher chart usually carries more weight than a random line drawn from one quick reaction on a very fast timeframe. This is why many traders find better results when they identify levels on a slightly higher chart and then refine the entry with a lower one. That logic fits closely with Best Timeframes for Binary Options Trading Strategies.
The strongest approach is simple: start with the market condition, identify meaningful zones, then wait for price to react in a way that actually supports the trade. That keeps the level connected to real structure instead of turning it into decoration.
Common mistakes when trading support and resistance
The first common mistake is drawing too many levels. When every part of the chart becomes a “zone,” nothing is really meaningful anymore. Traders end up forcing trades because they can always find a line somewhere nearby.
The second mistake is ignoring momentum. A level that worked before can fail quickly when price approaches it with strong directional pressure. Support and resistance are not walls. They are areas where reactions may happen. The word may matters.
The third mistake is trading the middle of the chart instead of the level itself. Many traders say they use support and resistance, but in practice they enter after price has already moved away from the zone and the trade location is no longer attractive. In binary options, that often makes timing much worse.
The fourth mistake is treating every touch equally. The first clean reaction at a level may be meaningful. Repeated tests can weaken it. A trader who understands this is usually more selective and avoids lower-quality setups.
What beginners should focus on first
For beginners, the best way to use support and resistance is to keep the process simple. Identify obvious zones, avoid clutter, and focus on how price reacts when it gets there. There is no need to cover the chart with lines. A few clear levels are usually more useful than many weak ones.
It also helps to combine levels with discipline. Do not force every touch into a trade. Ask whether the market condition supports the setup, whether the reaction is clean, and whether the expiry fits the speed of the move. If the answer is unclear, the level alone is not enough.
This is also where demo testing is valuable. Traders should observe how their chosen levels behave in different market conditions before risking real money. That is one reason Best Binary Options Demo Accounts: What Traders Should Test Before Going Live remains such an important guide.
Final thoughts
Support and resistance can make binary options trading much more structured, but only when they are used correctly. They do not predict every turn, and they do not work as automatic signals. What they do is improve trade location by helping traders focus on places where price is more likely to react.
The real edge comes from combining levels with context. When market condition, volatility, timeframe, and expiry all align with a clean reaction at support or resistance, the setup becomes much more logical. When that context is missing, the line on the chart means very little.
For the next step, continue through our Trading Guides, compare broker environments in Broker Reviews, and use Broker Comparisons to find the platform that best fits your trading style.
Top Brokers
⚠️ Trading is speculative and involves risk. Consider your financial situation carefully before trading.
Related Articles
Binary Options Scam Red Flags: How to Spot an Untrustworthy Broker